Chemical Education Journal (CEJ), Vol. 7, No. 2 /Registration No. 7-14/Received
November 3, 2003.
URL = http://www.juen.ac.jp/scien/cssj/cejrnlE.html
Teaching the chemistry of gases with hands-on experiments
Viktor K. Obendrauf1)
Universitaet Graz, Institut fuer Chemie - Anorganische Chemie, Schubertstr. 1, 8010 Graz, Austria
Angela M.C. Koehler-Kruetzfeldt2)
Freie Universitaet Berlin, Institut fuer Chemie, Takustr. 3, 14195 Berlin, Germany
E-mail: 1)viktor@obendrauf.com, 2)akoehler@chemie.fu-berlin.de
Introduction
Description of small-scale technique
Small-scale ammonia fountain
Traditional ammonia fountain
Classical ammonia fountain
Comparison of the two techniques
Summary
Acknowledgements
Literature
Introduction
Experiments with gases are an important part of chemical education
in high schools, colleges and universities. Even in well-equipped
laboratories, the time saving use of bottled gases is very often
restricted to hydrogen, oxygen, carbon dioxide and nitrogen. Some
of the other gases must be generated in traditional gas generators
- especially hydrogen chloride, ammonia, chlorine or hydrogen
sulphide. Strict laboratory safety rules and regulations to protect
the environment, on one hand, and lack of time and money, on the
other hand, must be considered.
Graduate students' activities can be realised by a change to a
micro scale. New video techniques and projection devices can help
to visualize the results of such small-scale experiments, but
additional possibilities can arise if the distance between the
lecturer and audience can be reduced, while using time- and cost
saving small-scale techniques. A small-scale portable apparatus
which needs no fixing stands and which allows the lecturer to
perform the experiment at close range to the students is much
more impressive than a badly arranged experiment in a fume hood
far away from the audience or behind a safety shield. In addition,
such an experiment is less time consuming and can therefore be
repeated safely.
Given the difficulties of storing gases (especially noxious and/or
explosive gases) in large-scale traditional glassware and considering
the importance of gas reactions in chemical education, simple
small-scale gas generators to perform portable demonstrations
have been proven to be very practical. In 1992, V. Obendrauf developed
a special small-scale technique with low cost material to handle
even toxic or flammable gases and to show in a safe way various
properties of gases, even violent reactions of stoichiometric
mixtures. Since then, many teachers in several countries have
reacted very positively to this development.
Description of small-scale technique
Material needed for the low cost gas generation and gas reactions:
- 1 test-tube Schott Fiolax® 16/160 mm, bulged
mouth
In this test tube the gases are generated. The thin, fireproof
material allows substances to heat up in a very short time; if
necessary, this substances can be cooled down again in a few
seconds in a water bath or with tap water.
- 1 soft rubber stopper (Verneret18D) with 1 or 2 syringe
needles (1.2/40 mm) pierced through the stopper as shown in figure
1
The tips of the needles in the stopper must be cut off as shown
in figure 2. The blunt needles in the stopper work as micro steel
tubes with luer connections. Needles without tips are not needles
any longer. The stopper works for months even with different
strong acids without having to replace the tubes.
Figure 1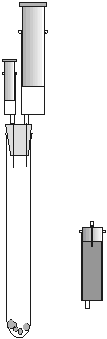 (Photo1) Figure 2
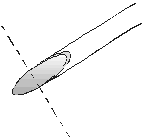 (Photo2)
- 1 disposable syringe 2 ml (HSW Normject® )
This syringe is used as a dropping funnel for liquids. The plunger
(without washer) must be difficult to move. For this property
a rough surface inside the syringe is useful. To suck up the
needed amount of liquid it is practical to keep the chemicals
in 10-20 ml narrow mouthed bottles. Thus even concentrated ammonia
solution can be used without problems outside the fume hood.
To avoid contact with the adhered chemicals, the syringe must
be cleaned outside after filling with water or with tap water.
The syringe can then be tightly positioned in the luer connection
steel tube of the special stopper.
- 1 syringe 20 ml, eccenctric luer conus (HSW Softject®
or ONCE® )
This syringe is used to collect and to store the generated gas
and stoichiometric mixtures. To avoid excess pressure in the
apparatus, the plunger must be easily movable compared to the
2ml syringe. The washer at the end of the plunger must therefore
be slightly greased with high boiling silicon oil.
- 1 syringe 10 ml without plunger, filled with granular
activated charcoal, closed with 1 rubber stopper with 1 syringe
needle in it as shown in figure 1
This device is very useful to avoid hazardous gases evaporating
from the gas generator when the 20 ml syringe is filled and no
more gas is needed.
- Steel tubes 1.2/40 mm with luer connections (syringe needles
with cut tips)
The thin steel tubes with the luer connections and the blunt
end serve for jets, e.g. to light hydrogen or ethyne ejected
from a syringe or to jet the wanted gas into a test tube or into
another syringe.
- Steel tubes 0.8/120 mm with luer connections (syringe
needles with cut tips)
The long syringe needles can be used as a reaction tube with
a very big (catalysed or not catalysed) surface inside.
- Micro burner (figure 3)
Portable, with piezoelectric sparker, refillable with lighter
butane, size of the flame adjustable, works in any position
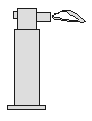
Figure 3
To show the abilities of this technique, we want to compare
an experiment with a traditional way of producing gases with this
small-scale technique.
To show the solubility of gases in liquids (water) and pH changes
in water with gas dissolved in it, the "ammonia fountain"
is a well-known experiment.
Since ammonia is highly soluble in water (at 20C and 100kPa 520g
NH3-gas in 1l water), it soon dissolves in a small amount of water
squirted into a flask, creating a partial vacuum that pulls water
up a tube into the flask of gas from a beaker located below. More
ammonia gas dissolves, which pulls more water from below. This
creates a fountain effect.
NH3(g)+H2O(l)-->NH3(l)+NH4+(aq)+OH-(aq)
Using an indicator such as phenolphthalein, the fountain results
in colour changes indicating the formation of 0H-.
Small-scale ammonia fountain
Produce ammonia in the low cost generator (photo3). Replace the air in a dry test tube
with ammonia with the help of the silicon tube as shown in figure
4 (left).
Close the test tube with the rubber stopper with one steel tube
in it. Connect the luer outlet with a 20 ml syringe which is filled
with water and some phenolphthalein (photo4).
You must hold the apparatus by the stopper, so that the syringe
is under the test tube (center).
By pressing the syringe, inject only a little bit water into the
middle of the test tube (right).
Immediately all the water in the syringe will be sucked into the
test tube without any further help (final).
Before opening the apparatus, close one luer outlet of the stopper
with an empty 2 ml syringe, then fill a 20 ml syringe with water,
connect it to the second luer outlet and inject some drops into
the gas generator apparatus. The generator can now be opened without
danger and prepared to show another ammonia fountain or to be
cleared away.
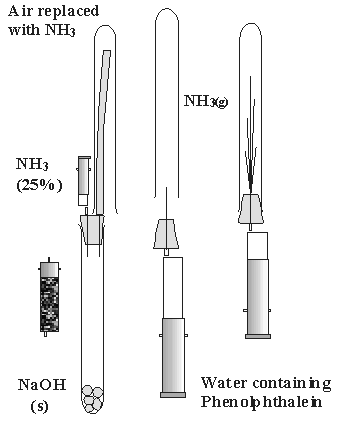
Figure 4 (Photos left,
center, right, and final)
Traditional ammonia fountain
Materials:
- stand and clamp
- dropping funnel
- 250 ml round bottomed flask with two holes for dropping funnel
and glass tube
- 100 ml round bottomed flask
- two big hole rubber stoppers with glass tubes, one small
rubber stopper to lock the dropping funnel
- 100 ml beaker
- spatula
Chemicals:
- concentrated ammonia solution
- 8-10 NaOH pastilles
- destilled water in squeeze bottle
- phenolphtalein
- indicator paper
Safety: Fill round-bottomed flask with ammonia in fume
hood. Wear safety goggles and gloves. Ammonia gas is extremely
irritating, especially to the respiratory system.
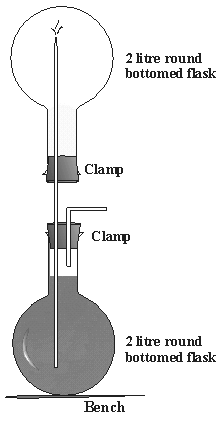
Figure 5
Classical ammonia fountain
Before you can start with the experiment, it is neccessary
to prepare the ammonia gas. First you have to put a dropping funnel
(with the help of a connector) to the 250 ml round bottomed flask
and fasten it with clamps to the stand. Now put the NaOH-pastilles
into the round bottom flask and close it with the big hole rubber
stopper with a hole in which you put a glass tube. Fill the beaker
with about 60ml dest. water and add five drops of phenolphtalein.
Fill 10ml amonnia solution into the dropping funnel.
To produce the ammonia gas, drip the ammonia solution into the
round bottomed flask to react with the NaOH and wait until you
notice a formation of gas. Collect the developed gas through the
glass tube in the 100 ml round bottomed. Always hold the flask
with the opening downward so that the gas cannot escape. Check
if there is gas in the flask by holding a piece of indicator paper
into the flask. Now close the small flask with the other stopper
with glass tube. Seal the lower opening of the glass tube with
a finger and invert the 100 ml round bottomed flask glass tube
into the previously prepared beaker. Remove the finger under water.
The fountain should start immediately, the water rushes up
to the top flask and the solution turns pink.
Clean up: Disassemble the fountain in a hood. Neutralize
solution to a neutral pH and pour down the drain.
Comparison of the two techniques
A comparison of these two alternative methods was made at the
Free University of Berlin. The techniques were tried out by 15
persons including both experienced teachers and beginners. All
persons experimented with using both techniques. Most of them
started the traditional way. The persons performing the experiments
had instructions for both techniques, but without a sketch. All
devices and chemicals were present. Each person worked alone and
entered the time required for each phase of the two techniques
into a list. For safety reasons, the experiments were done under
a vent.
The following table shows the mean time expenditure for different
phases of the two techniques.
| Experimentalphase |
Traditionaltechnique
(time in minutes) |
Small-scaletechnique
(timeinminutes) |
| Assembly of the stand and clamp |
1,8 |
no indication |
| Assemblyofthegasgeneratorforammonia |
2,7 |
2,7 |
| Fill the NaOH pastilles into round bottom flask |
no indication |
no indication |
| Gas production, displacement
of air from the apparatus |
2 |
1,04 |
| Lock round bottom flask with stopper |
1,39 |
0,5 |
| Dismantling of the equipment |
1,3 |
0,6 |
| Emptying and cleaning of the devices |
2,5 |
1,5 |
| Total time (mean) |
11,7 |
6,4 |
As seen in the table, the small-scale technique could be completed
in much less time than the traditional technique. (mean: 6,4 minutes
versus 11,7 minutes).
We also compared the costs for the traditional and small-scale
approaches.
| Cost |
Traditional |
Small-scale |
| Materials |
179,72Euro |
22,57 Euro |
| Chemicals |
5,54 Euro |
4,36 Euro |
| Total |
185,26Euro |
26,93 Euro |
As shown in the table, the cost of materials for the classical
ammonia fountain (185,26 Euro) was much greater than the material
costs for the small-scale version (26,93 Euro). The glassware
and the stands are reusable for other experiments. The same also
applies to the small-scale gas generator, with the difference
that many of the less expensive low-cost materials are also significantly
less breakable during regular use than the traditional material.
Summary
After spending a short time to get accustomed to the equipment,
the small-scale technique offers time- and cost saving possibilities
for performing small-scale reactions with gases safely and without
pollution of the environment.
Acknowledgements
Thanks to the teachers who took their time to try out the experiments.
Thanks also to Julia Torkel and Martina Kalle for their help to
put together the results and to Alexandra Wistel for drawing up
a sketch of the experiment.
Literature
[1] Obendrauf, V.: "Experimente mit Gasen im Minimastab",
Chemie in unserer Zeit. 1996, 30, (3) 118
 Top
Top
 CEJ Vol. 7, No. 2, Contents