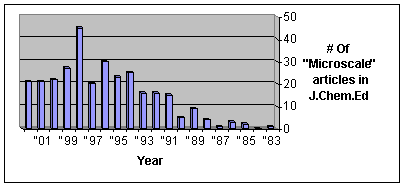
Figure 1: Number of articles on Microscale chemistry published in J. Chem. Ed. in the years 1983-2002
Chemical Education Journal (CEJ), Vol. 7, No. 2 /Registration No. 7-16/Received October 31, 2003.
* High- School Yavne, Holon, Israel 58806
** Department of Chemistry, Bar-Ilan University, Ramat-Gan 52900, Israel
***Kassel University, Germany (www.micrecol.de)
e-mail: livnehm@mail.biu.ac.il
Abstract
Introduction
Experimental
Experiment 1: Distillation
Experiment 2: Circle Chromatography (5)
Experiment 3: Column Chromatography
Experiment 4: Adsorption on active carbon
Experiment 5: Solubility and Extraction
References
Usually, the first lesson in chemistry at any level starts with the classification of matter. We then teach our students that materials can be either pure substances or mixtures, and when defining mixtures some separation methods are discussed. In the laboratory courses, emphasis is placed on the methods and techniques of separation, and which are eventually put into practice. Almost any lab book in organic chemistry starts with separation techniques such as crystalization, distillation, etc.(1,2). These techniques, both macroscale and microscale, are now well established at the undergraduate level. Adopting these methods and apparatus to high school labs can sometimes be inadaquate because of their complexicity, high cost, over-long lab periods, etc.
In this article we present five microscaled experiments in which the separation of mixtures is performed. The experiments include distillation, chromatography (circle and column), filtration, and extraction. All the experiments are cheap, easy to perform and can be done quickly. All the experiments are "green," and the materials chosen are routinely used in everyday life.
The Microscale approach: a short overview
Since the 19th century, instructional laboratories in chemistry were based on carrying out experiments with multigram quantities of materials. At the beginning of the 1980s a new approach was developed, according to which the amounts of materials used are reduced by a factor of 100-1000. For conducting experiments with such small amounts, there was a need to develop appropriate instrumentation and glassware, and this need has been met by an increasing number of companies and developers. To the best of our knowledge, no official statistics are available for the number of schools that use microscaled experiments, but some idea about the popularity of this approach can be deduced from the number of articles published on microscale issues in the Journal of Chemical Education (J. Chem. Ed.). This number has grown from the mid-eighties of the 20th century, now averaging more than 20 articles per year (Figure 1). Also notable is the fact that each conference on chemical education in the last 5-7 years organized a special session on "Microscale Chemistry". In addition, the first conference fully dedicated to Microscale was held in December 2001 in Hong-Kong (HKBU).
Figure 1: Number of articles on Microscale chemistry published in J. Chem. Ed. in the years 1983-2002
The Israeli experience: BIU and the high schools
Our experience in moving partially towards microscaling one of our advanced organic chemistry lab courses is very positive. Until 1991, all the laboratory courses in the Chemistry Department of Bar-Ilan University were based on traditional work with multigram-scale experiments. During the fall of 1991 we changed one of the organic chemistry lab courses to "Microscale". Quantities of starting materials were reduced to 50-200 miligrams and special glassware was used. We soon discovered that this was most beneficial. We found that despite the small quantities used, we still were able to introduce the students to a wide variety of techniques and experiments; In the Microscaled labs a greater discipline is achieved, the work is cleaner; and the environment is much safer. The hazards and fire risks are reduced to a minimum and the amount of waste is minimal. There is also a great saving of material, energy, and time. Most of the experiments are done within three hours and most of the students have time to recrystallize and to record their IR and NMR spectra. Starting in November 2003, many experiments in our General Chemistry lab courses are also planned to be performed on the microscale level.
Microscale laboratories in Israeli high-schools
Although chemistry is an experimental science, lab lessons in the Israeli high-school system have become increasingly rare. Since it was not compulsory for teachers to carry out experiments with their students, many of them preferred to teach chemistry mostly through frontal lectures. The growing number of regulations and lists of prohibited materials made it even more difficult to give lab lessons.
All this is now being changed in Israel. The National Committee responsible for the chemistry curriculum has decided to re-introduce the lab into the high school system, and as of last year each high school student who chooses chemistry as a major subject will have to carry out experiments as part of his/her curriculum obligations, and will have to be examined on that in the final matriculation exams (experiments are inquiry-approach oriented).
In view of this change, about three years ago we (the authors) initiated a project of developing 50 small-scaled experiments for middle and high school students. This project, which was sponsored by MALAM (The Israeli Higher Committee for Teaching Science), was finished a few months ago, and during the past year we have conducted many workshops on microscale experiments both in Israel and abroad. A final brochure was published (in Hebrew) in which each experiment contains an introduction, the goals, preparatory questions, experimental procedure, results, conclusions, and summary questions.
Materials and equipment
2 Well plates 6
Lid for well plate 6
Silicone rubber tube, 12 cm
Needle (cut edge)
Microscaled burner, 1 mL
5 mL distillation vial with septum
Clamp
Water or ethanol-colored solutions for distillation
Preparation of Microburner(3) (Figure 2)
Small scale burners are made from septum-capped medicinal vials, either new or used. In the case of used vials, they should be well washed and sometimes sterilized. The volume of the vials range from 1 to 5 mL and the time of burning 3-20 minute, respectively

Figure 2: Microburner
a. Preparation of the distillation apparatus
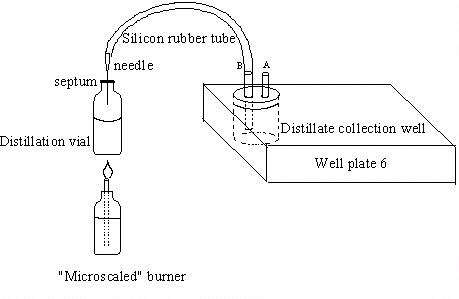
Figure 3: The distillation apparatus
b. The distillation process
c. Checking the distillate
If the distillate is pure water, a drop of it will turn the color of anhydrous CuSO4 to blue and the color of CoCl2 paper from blue to red-pink. If the distillate is ethanol, it can be burnt with a match. (It would contain some water in any case since it is an azeotrope). For ethanol, the boiling point can also be determined by the microscale method.(4)
Experiment 2: Circle Chromatography (5)
Materials and equipment
Filter paper 7-13 cm (solid phase)
Small plastic cup (or vial)
0.1% salt solution (eluent)
Markers of different colors (black and brown give best results)
Paper towels
Experimental
The circle chromatography system:
Draw a full circle or several points with colored marker(s) (dark colors are preferred) on the round filter paper close to its center (Figure 4, a or b). Make a hole in the middle of the filter paper and put it on the top of the plastic cup, via or beaker, in such a way that the tip of the paper towel cone penetrates the hole. Add a few milliliters of the eluent solution to the plastic cup and let it rise up in the paper towel. The chromatography will soon start and some nice forms can be obtained (Figure 4, a-b). The same practice can be done by the regular TLC "straight" method.
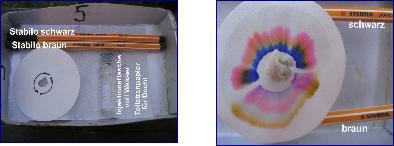
Figure 4a
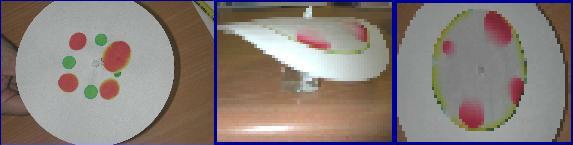
Figure 4b
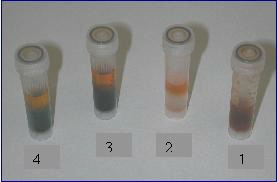
Experiment 3: Column Chromatography
Materials and equipment
A small beaker (50 mL)
Glass rod
0.1% salt solution (eluent)
Screw capped small vials or eppendorf small tubes for fractional
collection
A small piece of cotton
Pasteur pipette (plastic)
2- 2 mL syringes
Silicon rubber tube 3 cm
Baby food: corn-flour (solid phase) (Not any baby food will work,
and in each country the local appropriate kind should be found)
A mixture of red and blue food dyes (or any other mixture)
Experimental
Some pictures describing the advancement of the seperation on the column and the result are shown in Figure 5 (a, b, c).
 |
 |
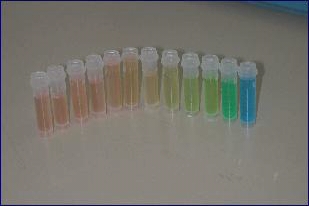 |
Figure 5: The advancement of the chromatography: left(a)- The blue food dye comes out first. Middle(b) - The red food dye comes out second. Right(c) - fractions collected during the chromatography
Experiment 4: Adsorption on active carbon
Materials and equipment
3- 2 mL syringes
Small piece of clay (or some other kind of seal)
3 kinds of active carbon (charcoal): powder (PAC),granular (GAC)
and pellets
Cotton
Pasteur pipette (plastic)
Well plate 6
Food dye (red) solution. 3-4 drops in 30 mL water.
Plastic pipettes
Clay (plastilin)
Experimental
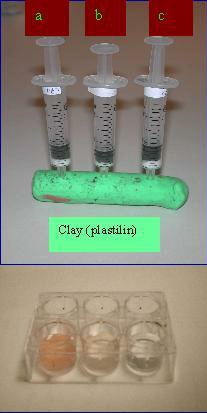
Figure 6
Experiment 5: Solubility and Extraction
Materials and equipment
3 mL screw capped vials
Natural oil (olive, cotton, etc.)
Solid paprika (the spice)
Food dyes (green and blue)
Pasteur pipette (plastic)
A spatula
Experimental
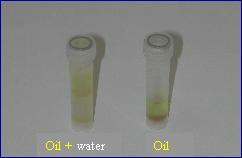
Paprika (soluble in oil)
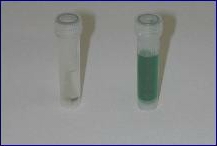
Green Food color (soluble in water)
Figures 7a, 7b, 7c
 Top
Top
 CEJ Vol. 7, No. 2, Contents