Chemical Education Journal (CEJ), Vol. 9, No. 2 /Registration
No. 9-13 /Received January 19, 2006.
URL = http://www.juen.ac.jp/scien/cssj/cejrnlE.html
E-mail: muha4![]() macam.ac.il
macam.ac.il
"Microscaling" means reducing the mass of chemicals
and the volume of the apparatus to an extent that does not compromise
the results. At school level, "microscale" comprises
the volume range between 5 milliliters and 5 microliters (~ 1
drop from a syringe with smallest blunted needle). In this article,
we present some experiments such as electrolysis, redox reaction,
and acid-base neutralization, using very small amounts of chemicals.
Chemistry is one of the science subjects which specialises, on the one hand, in learning the behaviour and structure of elements and compounds, and on the other hand, the changes which occur in all materials. Chemistry is an experimental science, and all that we know about materials are a result of doing many experiments (1, 2).
In this article, we present some very important and nice ideas regarding some experiments of chemical reactions using small amounts, such as one drop.
Some advantages of doing these experiments are (3):
o Students are encouraged: Experiments can be done quickly, even at home.
o Timid students will get in touch with chemistry.
o Their creativity will be stimulated: They can find individual solutions of a problem, their independence increases.
o Safer: Few drops can be easily collected in a tray used for the experiment, absorbed, and finally removed by a piece of tissue paper.
o Saves time: The experiments leave more opportunities for conversation and for reflection.
o Protects the environment: They use fewer chemicals, and produce less waste (less is more).
o Saves money: Special laboratory materials are replaced by disposable ones used in the daily life.
o Increases sensibility: Students become aware of problems connected to consumption, recycling, and raw materials.
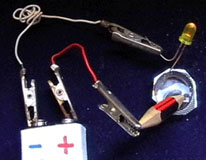
Procedure:
Sharpen a pencil on both ends to expose the graphite tips.
Get a blister pack (from a tablet) and add a big drop of sea water.
Connect the negative terminal of a 9-Volt battery with the short
pin of the LED (Light Emitted Diode). Connect the positive terminal
of the battery to one end of the pencil. Dip the other end of
the pencil and the long pin of the LED into the blister pack with
sea water (Fig. 1). For control,
repeat the experiment using tap water instead of sea water.
Observations:
The LED lights up because salt water conducts electricity
well. With sea water, gas bubbles can be seen at the pin and at
the pencil, with a smell of chlorine wafting from the pencil dipped
in sea water. For tap water, there is nearly no light and no smell
of chlorine.
Explanation:
Electric current transformed salt into chlorines. This is
called electrolysis:
Red: 2 H2O + 2e-
2 H2 (g) + 2 OH- (aq)
Ox: 2 Cl- (aq)
or 2 H2O
Thermodynamically, the last process is preferred, so in principle
bubbles of oxygen gas will be noticed and also H+ will
remain free in the solution near the anode. Because of over voltage
Cl2 is also produced on the anode (4, 5).
Electrolysis of water is usually done by adding some acid or base in order to increase the electric conductivity (4, 5)). In the following experiment, drops of an aqueous red cabbage extract will be electrolyzed between two injection needles.
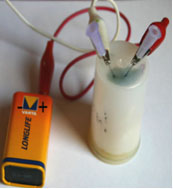
Materials
White film canister, sterile 1-ml syringe, 2 sterile hypodermic
needles (0.45 x 12 mm BL/LB), 9-Volt rechargeable battery, 2 insulated
copper wires with crocodile clips.
 |
 |
Procedure
1. Fix the needles by boring them through the film canister at a distance of 5 mm (see Fig. 2).
2. Add one big drop of the red cabbage juice indicator to surround the needles which will act as electrodes.
3. Use the wires to connect the electrodes with the battery.
4. After finishing the electrolysis, disconnect the needles from the power supply.
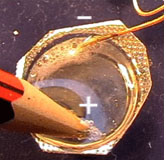
5. Observe the colors of the drops around each electrode.
6. Stir the electrolyte and observe the color. Add one drop of the untreated extract close to the original drop, but separate from it. Compare the colors.
Observations
1. The color of solution changes from purple to green-yellow (around the negative electrode) and to red (around the positive electrode).
2. Gas bubbles emanate at both electrodes (more at the cathode?).
3. After mixing the liquids around the two electrodes the color changes to blue.
Explanation
1. In this simple and quick experiment a cathodic reduction and an anodic oxidation take place in the left and in the right side of a single drop, respectively.
2. In spite of being neutral, water molecules are attracted by the negative and positive electrodes because many of the molecules surround the positive and negative ions of the solution.
3. The reduction results in an alkaline solution, while the oxidation produces an acidic solution:Red: 4 H2O + 4e-
Ox: 2 H2O
Redox: 6 H2O4. By mixing the liquids in the left and in the right side of the big drop an acid- base reaction (neutralization) takes place:
Acid base reaction: 4 OH- (aq) + 4 H+ + (aq)
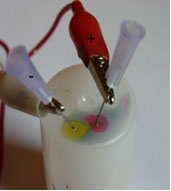
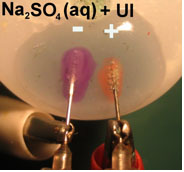
This experiment can be repeated using one drop of distilled
water with phenolphthalein or universal indicator to see the same
phenomenon with different colors of the indicators, as we see
in the follow experiment using drop of Na2SO4 solution with universal indicator (Fig.
3).
In this simple known experiment, add one drop of HCl and one drop of NH3 solutions into Petri dish one centimeter from each other. Attention must be paid not to allow the drops to mix. Cover the Petri dish tightly with a transparent glass cover. Observe the reaction for 10 minutes. A white residue is seen between the two drops but closer to the HCl drop.
This is a result of volatility of the HCl and NH3
molecules from the drops. These different molecules move in at
different speeds. The ammonia molecules have smaller mass so they
move faster than the HCl molecules, which have the bigger mass.
These volatile molecules meet close to the HCl drop and the reaction
between it is as follows:
The observed white residue is ammonium chloride, as shown in the above reaction.
Copper is known to react slowly with diluted nitric acid, giving NO; and very vigorously with concentrated (H 70 %) nitric acid, the product being NO2. Copper is a reddish-brown metal, widely used in plumbing and electrical wiring. Copper is oxidized by concentrated nitric acid, HNO3, to produce Cu2+ ions; the nitric acid is reduced to nitrogen dioxide, a poisonous brown gas with an irritating odor:
Cu (s) + 4HNO3 (aq) ![]() Cu(NO3)2 (aq) + 2NO2 (g)
+ 2H2 O (l)
Cu(NO3)2 (aq) + 2NO2 (g)
+ 2H2 O (l)
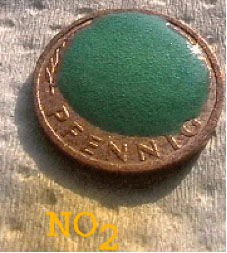
In very simple demonstration using a coin made of copper and one drop of concentrated nitric acid you can show your student these phenomena.
Procedure
Add one drop of concentrated nitric acid (HNO3)
to a copper coin. The brown gas produced in this conversion is
NO2. It is poisonous; so be careful not
to inhale it. In these a classic experiment, copper metal is turned
into copper (II) ion while the nitrogen (V) in the nitrate ion
becomes nitrogen (IV) in the nitrogen dioxide gas. The colored
solutions come from complexes of copper (II) ion in solution.
Aqueous copper ion is blue (Cu(H2O)42+). The green color must be due
to copper surrounded by nitrates.
Hazards:
This reaction must be done in a fume hood, because nitric
acid is extremely corrosive and the nitrogen dioxide produced
in this reaction is poisonous.
Into Petri dish, add one drop each of equimolar 1M HCl and 1M NaOH solutions. The distance between the two drops must be 1 cm. Add one drop of red cabbage juice to each one of the above drops. A red color appears in the acidic solution (HCl) and green color in the basic one (NaOH). With the Pasteur pipette tip, mix the two solutions. As a result, a purple solution is observed. The resulting purple color is the original color of the red cabbage juice (4).
Following the reaction of the acid and base, new compounds were
formed as shown in the formula below. The resulting water and
salt have no effect on the red color of the cabbage juice. Therefore,
it regained its purple color.
NaOH (aq) + HCl (aq) ![]() NaCl
(aq) + H2O (aq)
NaCl
(aq) + H2O (aq)
In this very simple experiment, we use a syringe to add one drop of salt solution to a Petri dish. Next to this drop, we add one drop of unsaturated oil triglyceride. Sharpen two pencils on both ends to expose the graphite tips. Connect the negative terminal of 9-Volt battery with one end of the pencil (see Experiment 1) and the positive terminal of the battery is connected with one end of the other pencil. Then dip the two other ends of the pencils into the big drop of salt solution.
In this simple experiment we demonstrate two-consecutive reactions
in a two-phase system. In the first step, reactive species like
hypochloric acid are produced in the water phase of the electrolysis
cell. In the second step, those reactive species diffuse to another
phase to react with unsaturated oil triglycerides and produce
a semi-solid product (10).
These simple and familiar demonstrations should make these experiments
safely available at all levels in chemistry classes. Students
who have conducted these experiments in our classes have experienced
excitement and fun, especially when observing visible consecutive
reactions. To the best of our knowledge, these are the first laboratory
experiments of consecutive reactions that can visually be observed
by students as they occur. Furthermore, the experiments explored
here offer students a versatile tool to investigate other types
of consecutive reactions in biphasic systems.
Aluminum is one of those few metals that can react with base (11, 12). The reaction between aluminum and base can be initiated by mixing small pieces of aluminum foil in a solution of sodium hydroxide.
In this very simple experiment, when we put small pieces of aluminum
foil in a Petri dish, and with a syringe, we add a drop of concentrated
sodium hydroxide solution to the aluminum foil pieces. In this
reaction system, sodium hydroxide reacts with aluminum to produce
hydrogen gas, as we see in follow equation.
A simple test for the hydrogen gas which produces as result of the reaction is done by using a small fire source so you can listen to the noise of the explosion, because water synthesis of oxyhydrogen gas in produced, as we see in the follow equation:
In this article we present some experiments such as electrolysis, redox reaction, and acid-base neutralization, using small amount of chemical materials, such as one drop. We recommended that the chemistry laboratory teacher use these ideas, not only with the specific reactions that we presented, but also with many different experiments in organic and inorganic chemistry.
We are grateful to Dr. Peter Schwarz for photographing the experiments
and for helpful discussions.
1. Shakhashiri, B. Z. (1992). Chemical Demonstrations: A Handbook for Teachers of Chemistry, Vol. 4. Madison: The University of Wisconsin Press. p.156.
2. Morrison, R. T. & Boyd, R. N.; (Eds.). (1992). Organic Chemistry, 6th edition, Prentice - Hall, Inc (Pub.), pp. 317-366.
3. Singh, M. M.; Szafran, Z. & Pike, R. M. (1999). Microscale Chemistry and Green Chemistry: Complementary Pedagogies, J. Chem. Educ. 76, 1684.
4. Hugerat, M.; Eilyan, S.; Abu-Rayya, M. & Basheer, S. (2003). Acid-Base Demonstration Through Electrolysis of Water Solution Using a Solar Panel, Journal of Science Education, N 2, 4, 96-97.
5. Schwarz, P. & Hugerat, M. (2004). "microscaling" Elektrolysen, PdN-ChiS 2/53. Jg. pp. 37-40.
6. Shakhashiri, B. Z. (1989). Chemical Demonstrations: A Handbook for Teachers of Chemistry, Vol. 3. Madison: The University of Wisconsin Press. pp. 83-91.
7. Petrusevski, V. M.; Taseska, M. & Monkovis, M. (2005). Reaction of Copper with Fuming Nitric Acid: A Novel Lecture Experiment in Passivation. The Chemical Educator, 10, Issue 3, 208-210.
8. Heiserman, D. L. (1992). Exploring Chemical Elements and their Compounds. New York: TAB Books, pp. 118-121.
9. Getman, F.H. (1940). "The Life of Ira Remsem"; Journal of Chemical Education: Easton, Pennsylvania, 1940; pp. 9-10.
10. Hugerat, M.; Basheer, S.; Schwarz, P. (2004). Chem. Educator, 9, Issue 1, 24-26.
11. Koubek, E. (1998). Acid-Base Chemistry of the Aluminum Ions in Aqueous Solution, J. Chem. Educ. 75, 60.
12. Hugerat, M. & Basheer,
S. (2001). "Experimental Demonstration in Teaching Chemical
Reactions", Journal of Science Education, 2,
109-111.
CEJ Vol. 9, Contents